

Στείλτε μας τις δικές σας εμπειρίες με email
HP 934, 934XL, 935 & 935XL Ink Cartridge Errors
- Λεπτομέρειες
- BLOG
- Εμφανίσεις: 1014
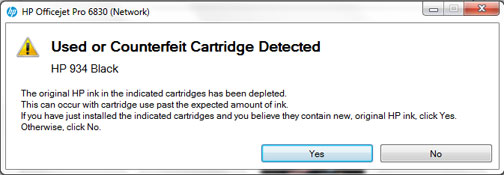
NOTE:“Empty”, “Low Ink”, “Out of Ink“, “? Marks“, “Used“, “Counterfeit”, “Refilled or Depleted Cartridge Detected” and “Non-Genuine Cartridge” alerts are COMPLETELY NORMAL for all HP 934, 934XL, 935 & 935XL black and color ink cartridges which have been refilled and are initially installed into the printer. These nuisance messages may be bypassed and normal printing will be available. Since new replacement chips were installed, ink level monitoring will be available.
NORMAL Cartridge Alerts
1) Upon installation of a refilled HP 934, 934XL, 935 & 935XL ink cartridge you will observe various ‘Used’, ‘Counterfeit’ & ‘Non-HP’ alert messages. Choose ‘Yes’, ‘Continue’ and/or ‘OK’ to bypass the various nuisance alerts. This will enable normal print operations.
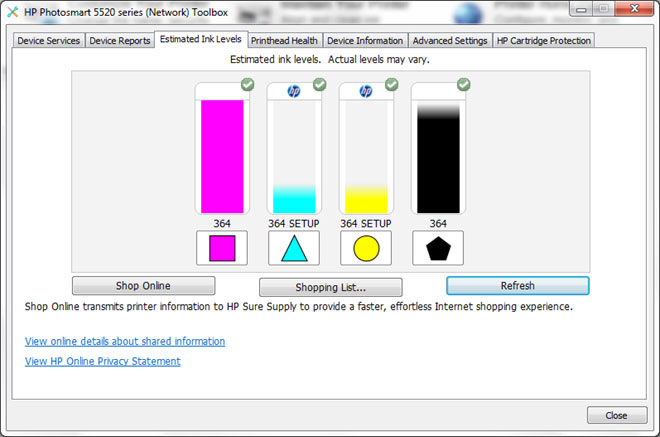
2) Since the HP 934, 934XL, 935 & 935XL cartridges have new replacement chips installed, ink level monitoring will be available. NOTE: Upon refilled cartridge installation the printer may show a “Low Ink” alert message one time, simply select ‘OK’ to proceed.
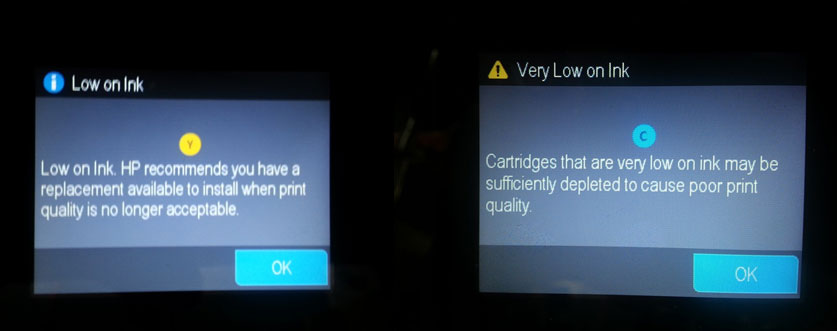
3) During normal printing you will observe two levels of ink low warning messages – this is normal.
ABNORMAL Cartridge Alerts
If the printer cannot recognize the ink cartridge (i.e. “Cartridge Error”, “Missing or Damaged”, “Unrecognized Cartridge”, etc.), then first re-seat the ink cartridge(s) in the carriage. If this does not correct the problem, remove the suspect cartridge and carefully inspect the smart chip on the bottom. The chip should be present (two different types shown below) and there should be NO cuts or gashes on the micro-chip surface as this may render the cartridge unusable.

If the problem persists, then remove all 4 cartridges from the carriage. Pull up on the PRINTHEAD release latch (at right side) and remove PRINTHEAD. Inspect electrical contacts on PRINTHEAD and on Carriage for ink residue. Adhering to manufacturer instructions, thoroughly clean the electrical contacts. Reinstall the PRINTHEAD and lower latch to secure. Reinstall cartridges and retest. For more information click here:

Connectivity problems, between the cartridge and Printhead, include error messages such as “Unrecognized“, “Missing or Damaged“, or “Ink Cartridge Problem”. Also refer to NOTE at bottom of page.
1. Remove ALL ink cartridges.
2. Check cartridge chip surface for ink residue/contaminants; thoroughly clean chip contact area using a water or isopropyl moistened towel.
3. Install ALL ink cartridges to see if problem clears.
An “Incompatible Printhead” or “Alignment Failed” error message is NOT an ink cartridge error, but instead a possible failure indicator of the large electronic assembly used for firing all four (or five) colors onto the paper. If you observe this message it is suggested you visit HP for recommendations on how to correct. General HP ink series printhead removal procedures are provided below for informational purposes only.
To check the electrical performance of the printhead refer to the diagnostic test for your specific printer model, click here:

If you encounter a severe ink cartridge error which prohibits printing, perform the recommended solutions below. If you think the refilled cartridge might be bad, take it back to your refiller and have them re-check the cartridge.
Recommended Solutions
The contact between the ink cartridge and the printer must be clean for proper functioning. If any dirt, ink or paper dust is on the contacts, the printer may indicate that the ink cartridge is bad. To ensure a clean contact, follow the steps below:
1) Remove and re-install the cartridge
- Turn the printer on; open the printer to access the print cartridges.
- Remove the suspect cartridge(s) from the station.
- Re-install the cartridges in their stations.
- Close the printer.
- Turn off the printer for 30 seconds and then turn it back on.
- Print a test page following your printer’s instructions.
- If this does not work, please proceed to step 2.
2) Re-set the printer:
a. If the problem persists, it may be useful to perform a “hard reset”. This can correct an electronic flag setting inside the printer telling it that the print cartridge is problematic. From the printer’s main menu, select (Note: printer buttons will NOT be illuminated):
- BACK
- CANCEL
- BACK
- CANCEL
Inside the Service Menu, locate the Resets Menu, select Semi-Full Reset to reset the printer.
b. Refer to diagnostic test file for additional printer model specific instructions, click here:
c. Print a test page to determine if the problem has been resolved.
d. If a printing-related problem persists, see below.
Severe Print Quality Issue or Missing Colors
1) If any streaks or missing colors appear on prints, initiate a ‘Clean Printhead’ via the printer control panel ‘Setup’/’Tools’ menu. On some printer models, the ‘Clean Printhead’ procedure will yield a test pattern – inspect pattern to ensure all colors are firing and solid bands of color appear. With other printer models you will need to select a test/diagnostic print under the ‘Tools’ menu. You may need to perform the ‘Clean Printhead’ procedure several times if the printer has been idle or rarely used.

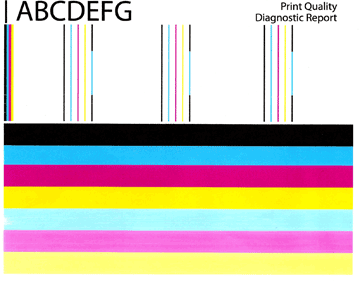
2) To verify all colors are firing properly, print a Self Test page or Print Quality Report under the tools or maintenance menu. You may also select an Inkjet411 test print by clicking the button below:
A normal looking Print Quality Report (i.e. internal printer test) is pictured below:
3) If all colors are printing but you observe cross-contamination (colors appear to bleed onto each other), then it is suggested to clean the service station…click here for instructions:
4) If you cannot identify which color cartridge is empty, print a test/diagnostic page via: 1) your printer control panel or 2) via the ‘Test Prints’ button below. A faded/missing color indicates empty. In the examples below, streaking/banding can be observed – running the ‘Clean Printhead’ can help remedy these issues.

5) If missing colors or severe/poor print quality continues to be observed following a 72 hour wait period (i.e. allows enough time for ink to fully absorb into cartridge foam), then flush the Printhead. Check your printer’s User Manual to see if your printhead can be easily removed.